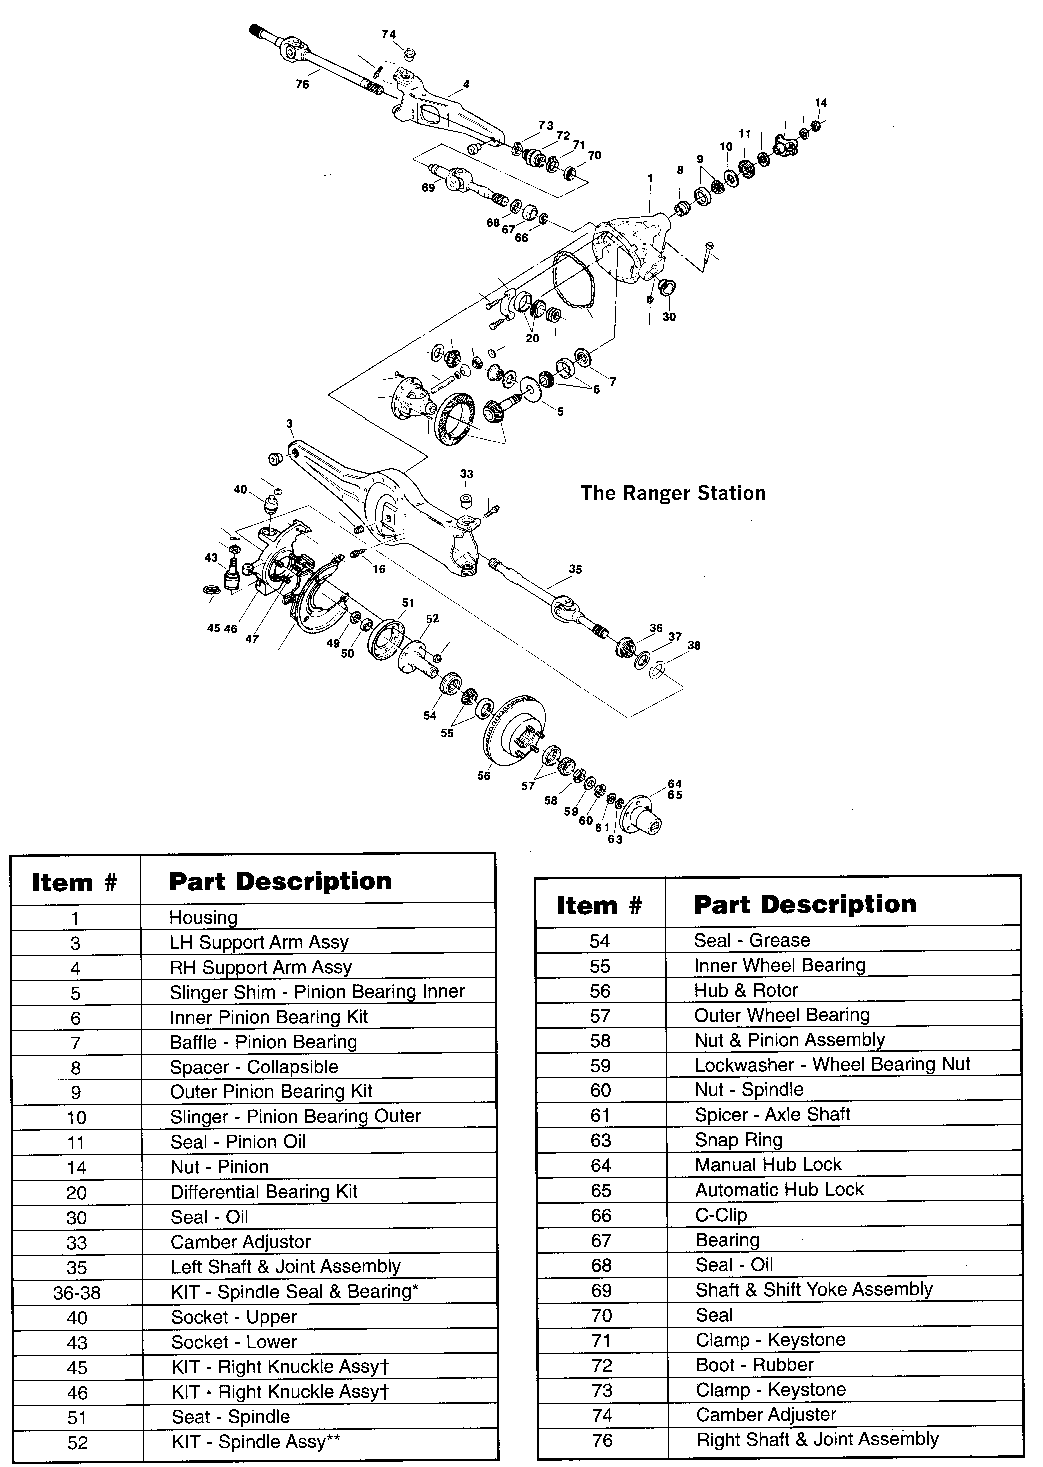
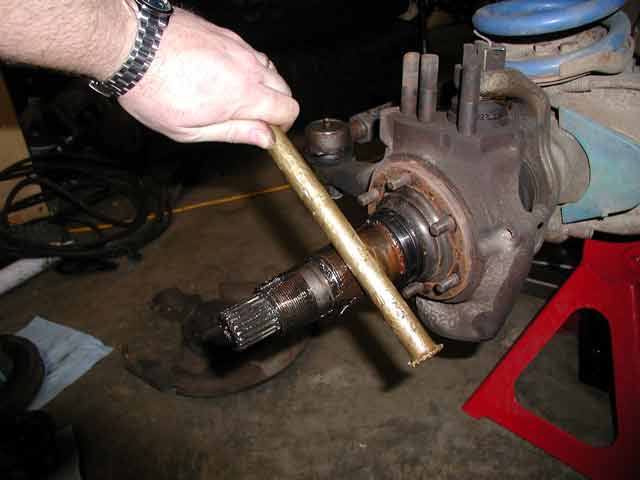
I am replacing all three front u-joints, along with bearings and seals as necessary. I haven't made it too far into the disassembly yet: I have the outer hub and the caliper off as well as the c-clip and thrust bearing/spacers/etc. The nut that requires the special socket is where I'm stuck. I can't for the life of me figure out how I'm going to get that off without an impact wrench (which I don't have). I say that not because I expect to need the extra torque of the impact (although I might), but because the tool is very poorly designed for use with a ratchet or breaker bar. The socket only engages the nut by less than a quarter inch and as soon as I try to apply force to the breaker bar (actually, only 15"...does that even qualify as a breaker bar?), the socket comes unseated from the nut. As an engineer, I've got the free-body diagram going through my head as I'm doing this and it's clear why it comes unseated: as I apply a force downward on the end of the handle, I'm not only applying the torque I want to apply, but also a torque oriented perpendicular to that torque. It's as if I were pushing down on the socket where the handle attaches to it, and it rotates off of the nut in that direction as expected. Does anyone have any tips on how to prevent this? I've tried leaning against the socket to apply pressure with my leg/knee, but it's tough to do that and still apply much force to the handle. The only thing I can really think of is to get a piece of pipe a few feet long and use that with my breaker bar/socket drive handle and also have a friend push against the socket to apply pressure. Aside from that, I just see an impact being my only option since it would directly apply a torque to the socket instead of a torque and a downward force. I guess one more option would be to support that corner on a jack and use the jackstand to support the socket to balance the downward force I'm applying...That's one I can try on my own. Does anyone have any suggestions or tips about how they did it?
Thanks!
replacing front u-joints - disassembly question


Nomad84
Been a while since I've done front hub work, and I don't recall having to use a lot of force to remove the nut.
But anyways, here's a thought or two . . .
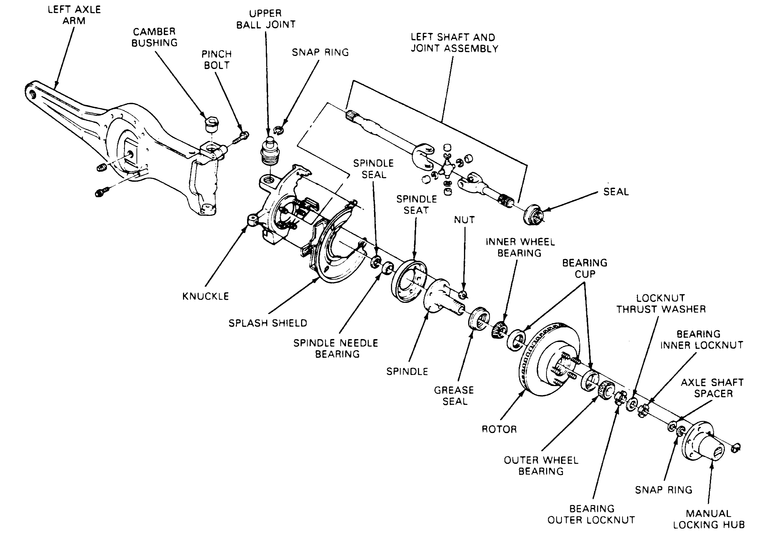
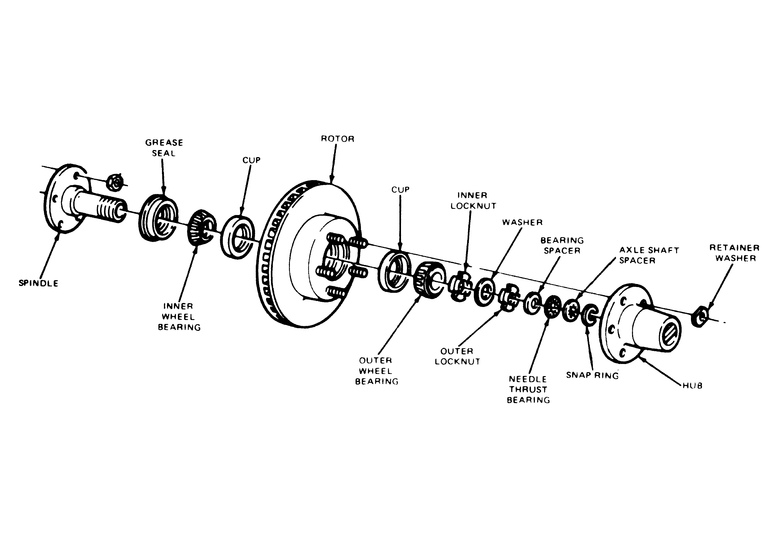
Are there any clips or keys that should be removed prior to nut removal? I think I remember a small keyway with a small key that must be removed before the nut can be unscrewed. If you go down on the forum to the thread "new24x4" originally posted by "cpubuilder" you will see an diagram I made of the front assembly of my '87 B2 showing the key that must be removed. I seem to recall I had to use a pair of fine tweezers and a bit of CHEWING GUM to wiggle the key out! (After thoroughly cleaning all the grease off.) Of course, you may already have removed this.
Another idea: Can you possibly:
Drill a hole through the socket (both sides) so that you can insert a bar (maybe a 1/2" steel rod) and apply force to both sides at once? (Probably easier to just buy the "good" socket!)
CraigK
Been a while since I've done front hub work, and I don't recall having to use a lot of force to remove the nut.
But anyways, here's a thought or two . . .
Are there any clips or keys that should be removed prior to nut removal? I think I remember a small keyway with a small key that must be removed before the nut can be unscrewed. If you go down on the forum to the thread "new24x4" originally posted by "cpubuilder" you will see an diagram I made of the front assembly of my '87 B2 showing the key that must be removed. I seem to recall I had to use a pair of fine tweezers and a bit of CHEWING GUM to wiggle the key out! (After thoroughly cleaning all the grease off.) Of course, you may already have removed this.
Another idea: Can you possibly:
Drill a hole through the socket (both sides) so that you can insert a bar (maybe a 1/2" steel rod) and apply force to both sides at once? (Probably easier to just buy the "good" socket!)
CraigK
Of course, I have the sucky socket. I wasn't aware that there were two kinds, but I went to O'Rielly's and Autozone and they both had the same kind. I was looking for loaners but Autozone's loaner was a 6 prong tool and O'Rielly's didn't have any at all to borrow.
Craig, that's the first I've heard of a key. I'll have to clean everything better and check. In your drawing, it looks like it's further in that where I'm at now. There are two nuts, right? It looks like you are talking about the inner nut, but I can't read all of the writing in the pic. I've been using the following:
http://www.therangerstation.com/tech_li ... build.html
http://broncoii.org/techpages/d28ujoint ... /index.htm

I don't see any mention of a key in any of those. I'll check it out a little later and see if I can find anything when I clean it better.
Thanks guys!
Craig, that's the first I've heard of a key. I'll have to clean everything better and check. In your drawing, it looks like it's further in that where I'm at now. There are two nuts, right? It looks like you are talking about the inner nut, but I can't read all of the writing in the pic. I've been using the following:
http://www.therangerstation.com/tech_li ... build.html
http://broncoii.org/techpages/d28ujoint ... /index.htm
I don't see any mention of a key in any of those. I'll check it out a little later and see if I can find anything when I clean it better.
Thanks guys!
Okay...so I got the nuts off. My jackstand brainstorm worked. I supported the passenger side with the jack and moved the jackstand to the outside to support the socket. It almost looked like I was supporting the passenger side with the socket, but of course the weight was on the jack. The jackstand aligned and supported the socket and made it easier to apply force to the handle without the socket slipping off. Soaking it with WD40 last night probably didn't hurt either. The driver's side came off without the jackstand trick. Both sides were assembled incorrectly. The first set of washers behind the C-clip were in the wrong order. On the drivers side, the lock washer with the holes in it was on the inside, then the two nuts. I'll have to check the inner nut after I get it cleaned up and see if the pin on it got damaged by the incorrect assembly. I think my dad probably had that corner apart to pack the bearings at some point before he gave it to me (he had it for several years). I don't know if he misread the book (definitely easy to do) or if it was together wrong when he got it and he just put it back the way it was.
Craig, there is no key, but there is a keyway. The lock washer between the two nuts has a key built in to it that locks into the keyway. One of the holes accepts a pin on the inner nut to lock it into place. The outer nut secures the lockwasher in place.
At this point, I am trying to get the spindles off. I got the nuts loose, but the spindles just won't budge. I hit them with WD40 and I'm gonna let them sit for a while. I tried a hammer and screwdriver for a while nothing wanted to budge at all. Hopefully a little soaking will help things out. In the meantime, I'm gonna sit here and watch the end of the race
-
tekatlarge

- Posts: 992
- Joined: Tue Jan 17, 2006 8:54 am
- Location: Coastal, Worshington
Hey there Nomad,
I would forget the WD 40 and go get a can of PB Blaster.. I heard about this product several years ago and everyone was saying how great it was and all. Now I am not the type to just go buy it on a whim. I was tearing down a D28 that had real bad rust. I tried everything to no avail. I broke down and bought a can. I was IMPRESSED it worked like a charm better than anything I had used before!
Just my 2 Cents worth.
I would forget the WD 40 and go get a can of PB Blaster.. I heard about this product several years ago and everyone was saying how great it was and all. Now I am not the type to just go buy it on a whim. I was tearing down a D28 that had real bad rust. I tried everything to no avail. I broke down and bought a can. I was IMPRESSED
Just my 2 Cents worth.
The Tek @ Large
Coastal,Worshington
Livin life on the dole on the Coast
Coastal,Worshington
Livin life on the dole on the Coast
Thanks. I might try that sometime. I've got the right side apart right now, but I still can't get the spindle off of the left. I gave up last night on both and this morning I went and bought a bigger hammer and a punch and chisel set. I had been using a big screwdriver and a small hammer. I also bought a little blowtorch and put some heat on it. If I had know it was an interference fit I might not have done that, but I think it helped break the seal. I didn't figure that out until the right spindle started to move. I figured once I broke the seal it would come right off. I actually took a small chunk out of the knuckle before I got the spindle to come loose. Oh well. I keep going back and forth between continuing with the passenger side and banging on the driver's side spindle for a while. When I get tired of hammering, I go back to work on the right side. I'll get it eventually.
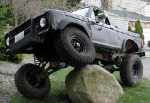
My dad said years ago that this thing needed front U-joints. He gave it to me a couple of years ago and I used to use it when I was back at their house for the weekends, so it wasn't driven much. I brought it up to where I live (2 hrs away) last winter and I've used it a few times for getting around in the snow and some light off-roading. I'm glad I've taken it easy on it...I've got the right axle out and it doesn't even feel like the U-joint has any rollers left in it at all. Guess it's a good thing I'm changing them out!
BTW, how important is it that the washer with the holes locks the inner spindle nut in place? Since the driver's side was put together in the wrong order last time it was apart, the little pin broke off of the nut. Apparently it's been that way for years, so I'm inclined to believe that I can get away with using it as is. Won't the second nut serve as a locking nut and keep either of them from moving?
-
tekatlarge
- Posts: 992
- Joined: Tue Jan 17, 2006 8:54 am
- Location: Coastal, Worshington
You might be able to get away with it but because it is a part designed to keep things locked, I wouldn't do it. Nothing ruins a day more than loosing a front wheel and having no control.
That may be exaggerated a bit but what I am saying is NEVER skip on safety..
Nuff said..
That may be exaggerated a bit but what I am saying is NEVER skip on safety..
Nuff said..
The Tek @ Large
Coastal,Worshington
Livin life on the dole on the Coast
Coastal,Worshington
Livin life on the dole on the Coast
Don't run without that lock washer. The bearing on Dana 28's are close together which leads to them coming loose as is. Those spindle nuts are the only thing keeping your tire on.
As for removing the spindle, I use a brass drift. Lay it on it's side on the spinde between where the bearing ride. Hit it with a hammer and work side to side and up and down. Once you get a little crack started, stick a screw driver in there then hit the opposite side of the spindle.
Once you have everything apart, clean up the spindle and and knuckle with a wire wheel or sand paper. Add a bit of grease on reassembly and it should be a slip fit for many years to come.
Nobody, thanks for the suggestion on the brass drift. I've avoided hitting that part of the spindle for fear of denting it. Not sure why it didn't occur to me to use something softer to take the brunt of the impact. I don't have a brass drift, so before I go buy one I may try wood. It may work or it may be too soft, but it's worth trying. I may never have this front end apart deeper than the bearings again (I'd like to swap in a Dana 35 in the future), but if I do, it should be *much* easier. I don't believe it's ever been apart since it was new. The U-joints are completely shot. The one I've got out of the truck (right-most one) has no pins left in it on either side on one yoke and is hard to move by hand (very stiff) on the other. The caps are cracked and at least one cap is missing a chunk out of it. Even so, I can't get any of the caps to budge at all. (Yes I took the C-clips out) Soaking in penetrating lube for now...I'll try again tomorrow. I can't imagine how I haven't broken anything driving it with U-joints that bad.
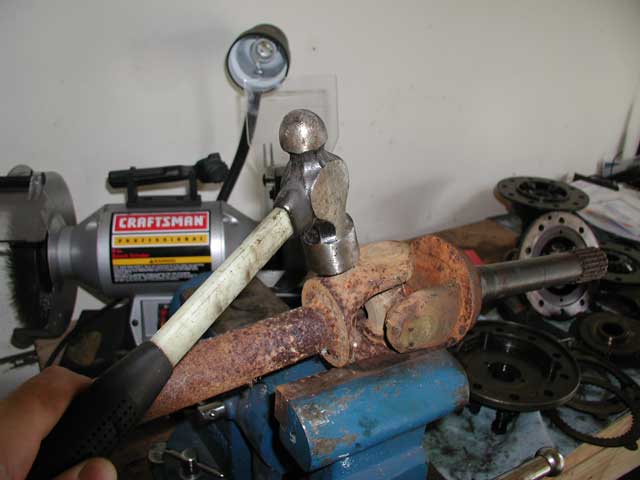
So I need to hammer farther back on the yoke just to jar everything loose? I put a punch on the u-joint cap and hammered the crap out of it, but it didn't do anything. I haven't messed with it since then. I'm thinking that if the one I've got out is this bad, the other two will be too, so I've about decided I'm going to crack open the diff so I can just get all three u-joints out and get my hands on them. There's probably no point in even trying to change the center one in the truck. I've about decided to just dunk them all in an oil bath for a couple of days before I try too much harder to get them separated. I wanted to change the diff oil soon anyway, so I'll just get it done before I button it all back up.Nobody wrote:To remove the u-joints, place the axle in a vise as pictured. Note you are not clamping it, just using the vise for support. Hammer it the spot shown to avoid damaging the ears of the shaft. This works on the most stubborn axles you can find.
One of my problems is that I've never done this before. Another (maybe worse) problem is lack of tools. I've spent over $100 on tools since I started on this little project this weekend. Granted, some weren't really related to what I was working on, but you walk into Harbor Freight and you walk out with more than you planned to buy
Basically you rest axle in the vise on the ears of the stub shaft. Then hammer as shown on the axle, not the cap. The axle will go down forcing the cap up. Flip axle over and repeat. Then remove the stub shaft. Then rest the stubbs of the exposed ujoint on the vise and hammer the stubb shaft in the same position to remove those caps.
I guess it's kind of hard to explain. Maybe that will make a good tech video.
I guess it's kind of hard to explain. Maybe that will make a good tech video.