Budget Build 86 B2

This is the place to Blog your buildup. If your Bronco II isn't in here, it should be!
Please, one topic per vehicle.
Post Reply
moogvo
Posts: 14
Joined: Sat Feb 12, 2011 8:09 pm
Location: Hazzard County, NC

Budget Build 86 B2

Post by moogvo »

Back in February, I was able to get an '86 B2. Dude had it on Craigslist and wanted $400.00 for it. he told me that he had a title for it. I got there, decided I wanted it, loaded it on the dolly and was ready to hand over the cash... until he showed me a title that had someone else's name on it. It was incorrectly signed 2 years prior, and was not notarized. He told me that his girlfriend was a notary and that she would take care of it. She was not available. he knew several notary's, but none of them would touch the title. They would have to have back-dated their signature 2 years and nobody was willing to do it. The day I was there and we were trying to find someone to take care of the title, He started looking through his cell phone, claiming that he was friends with the guy who was the legal owner and that he would probably do a lost title application. (That is of importance later)

He invited me to take it home (an hour away) for $300.00 and pay him the rest once his girlfriend was able to notarize the title. I tried for over a month to get it taken care of. At first, he gave me a bunch of excuses. Then, he quit calling me and ignored me completely. he even hid inside his house when I went back to the door as a last resort.

Realizing that to get a title under those circumstances would be fraud and forgery, I was about to start parting it out to get it out of my yard when I came across an old registration in the glove box. I searched for the titled owner and found him on Facebook. A call to the DMV verified that he was the current legal owner. He drove an hour to meet me at the local DMV office to apply for a lost title/Transfer of ownership. 3 weeks later, I had a fresh title with my name on it. While in line at the DMV, I asked him if he knew the guy I got it from. He had never heard of him. He wasn't even the guy that the thing was sold to 2 years before. So the guy I got it from was lying to me the whole time.

3 weeks after I got the title, Seller/liar dude sent me a text saying that he wanted me to pay him $300.00 more or bring the B2 back... that he had another buyer that didn't care whether or not it had a title. He even threatened that the titled owner would report it to be stolen if I didn't return it. I informed him that I was now the legal owner... That I had located the guy whose name was on the title, who accompanied me to the DMV office and signed it over to me, and who now is following the build on my Facebook page; giving me vehicle history along the way as I need it. He gave me a few choice words in return and I haven't heard from him since. So I had a grand total of $340.00 ($300.00 plus the cost of the lost title application) into this truck.

And now... On with the countdown...

So here is what I have... A $340.00 1986 Bronco II 4x4 with a 5-speed and a 2.9L with a blown head gasket. It is dog ugly, but the body is straight and the only rust is surface rust on the body. The inside is in great shape. It has a bit of a smell since the hatch sat popped for 2 years and got rain water all over the back carpet. It started up and ran great. I drove it onto the dolly under it's own power. It didn't smoke or make any funny noises. It held great oil pressure, even after letting it run for 30 minutes in the driveway. The temp gauge seems to work and it never showed the engine to be overheating.

Here it is the day it came to live with me. I put a tow bar on first thing so I could tow it around with me to work on it different places and to tow it to go wheeling after it's done:

Image

So here are my plans for the B2... I am going to get the 2.9 running and make it roadworthy. I will insure and tag it and use it for a runner rat around town. the project will be far from over, however. I am going to lift it, do a 351 swap, upgrade the axles and will probably run 33s on it. In the meantime, though, Let's get it running.

I will continue to post when I have time to bring you up to date on what has been done so far.
Tom Moog

This post contains artificial watermark. Hold at angle to view.
B2ornotB2
Posts: 6
Joined: Sun May 08, 2011 6:51 pm
Location: Folsom

Re: Budget Build 86 B2

Post by B2ornotB2 »

Great story! I would be so paranoid thinking the seller would vandalize the Bronco, I would probably just resell it. :rolleyes:
Good luck with your build.

I too just acquired a Bronco ii for next to nothing. It's a great feeling getting a complete vehicle for peanuts, right?
moogvo
Posts: 14
Joined: Sat Feb 12, 2011 8:09 pm
Location: Hazzard County, NC

Re: Budget Build 86 B2

Post by moogvo »

He doesn't know where I live. so I am not worried much about that.

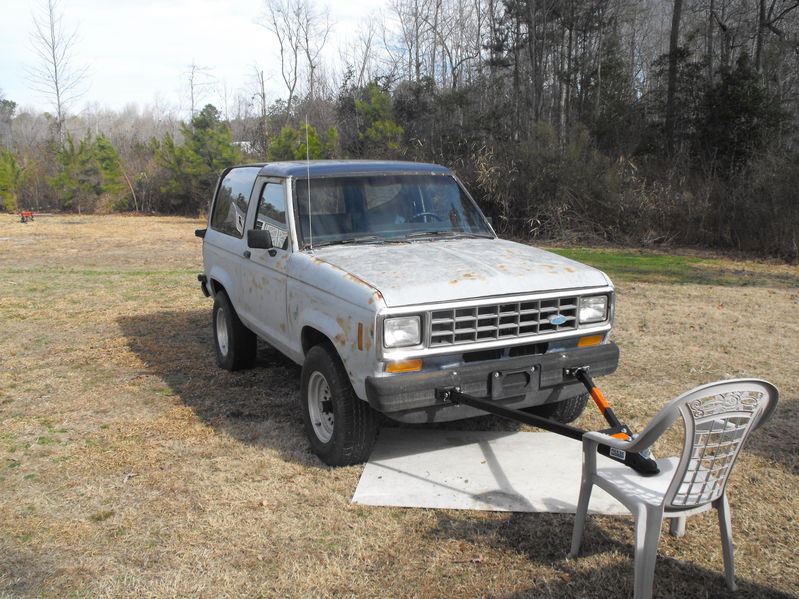
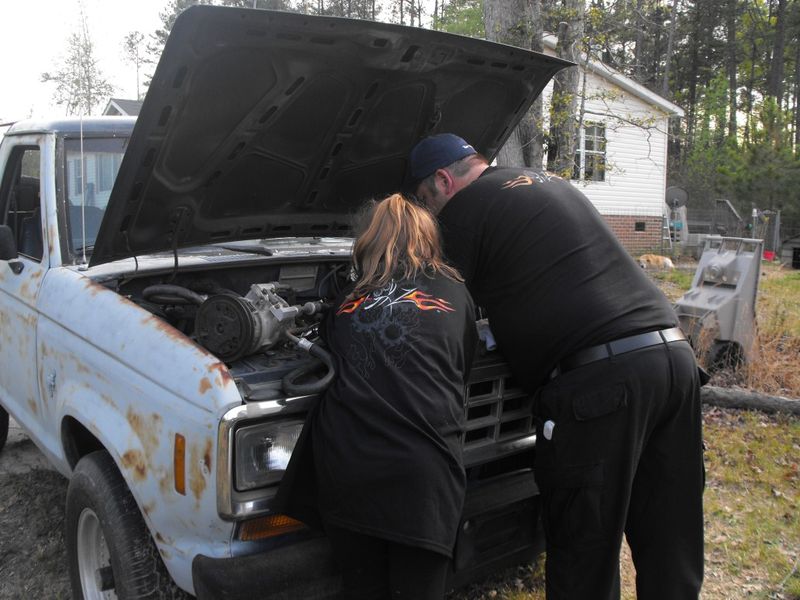
The first order of business was to do some diagnostic and see what this thing's ailment really was. I had been told that it had a blown head gasket, but without some sort of troubleshooting, I wasn't about to go digging into the motor. First, I used a block tester to look for exhaust in the radiator. nothing. Second, I looked for water in the oil. None visible. Third, I looked at how much water was coming out of the exhaust pipe when it was running... Negligible amounts. Fourth, I disconnected the coil and spun the engine over... bingo! I could hear that not all cylinders had the same compression. Granted, that doesn't necessarily mean a blown head gasket, but I was going to have to rip it down anyway to see what it was. I decided to treat it like a blown HG and started tearing it down. Here is where we started:

Image

I started by getting the A/C compressor out of the way. you can disconnect the brackets and compressor and move it out of the way without breaking the seals. I don't know if the A/C works in this truck, so I left it all intact... Just in case. The compressor easily swings out of the way and lays neatly on top of the battery. you can move it back to the stock location when you are done and want to close the hood. you could also take the battery out and lay it in the battery tray.

I went to work disconnecting the throttle linkage, Air box, lines, EGR valve and several electrical connectors. A word of advice on this; keep a roll of masking tape and a Sharpie handy so you can mark your connections. Also, take pictures in case you need a visual aid to get it all back together. you can't remember where everything goes unless you have done this several times before. Believe me, you don't want to create a puzzle for yourself to figure out later.

I tried to clean the engine so that it wouldn't be a nasty job, but that was an epic fail. there was just too much grease and crud on the engine. I took out the radiator and fan shroud. They were sort of in the way, and I have to replace the water pump anyway, so... Next was to remove the upper intake. There are vacuum lines, electrical connectors and a ground on the back near the firewall. there are looms of cables woven in between the legs of the upper intake. All of these should be marked so you know how they go back together later.

I got the radiator, shroud and upper intake out and set them in the building. Next, I had to remove the fuel lines from the fuel rail. There is a tool for that and you don't want to mess with it without the tool. Given some persuasion, you probably can get the lines off without it, but you risk damaging the fittings... Besides, at about $5.00, the tool is cheap enough.

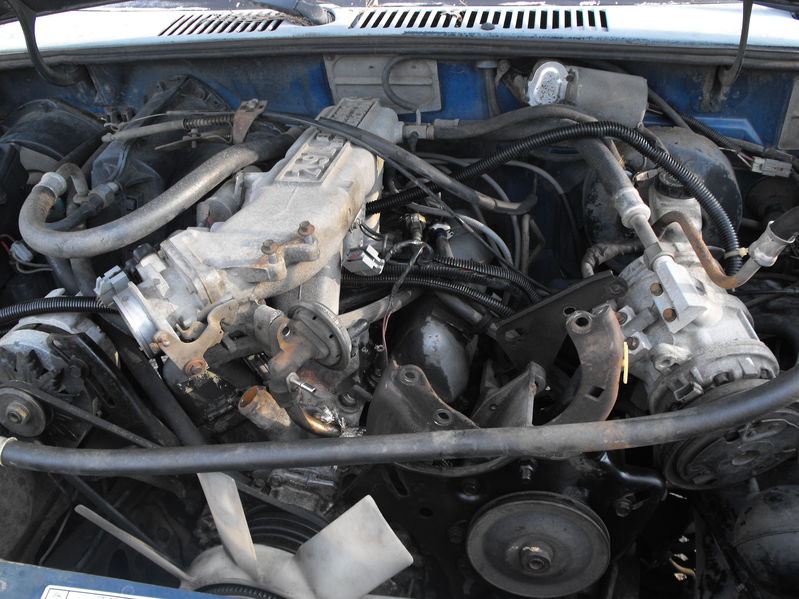
Once the fuel lines are off, you can tuck them away into a place in the core support to keep dirt from entering the lines. There are a combination of studs and bolts that hold the UI in place. Remove them and you should be able to lift the upper intake out. Go slowly to make sure that you have disconnected the vacuum lines and electrical connections. I removed the ground strap from the rear of the UI once I had it free from the engine. Here is a shot of the engine with the UI and one valve cover removed:

Image

Then, I moved to the distributor. I took the cap off and marked where the rotor button was on the lower casing of the distributor. I also marked the distributor in relation to how it was sitting in the truck so that I will be able to put it back in the same position during reassembly. As you pull straight up on the distributor, the rotor button will start to turn counter-clockwise. I marked the distributor casing again once the gear was free of the cam to assist in re-installation later. I discarded the cap and wires. The rotor is still installed in the distributor, but will get replaced later when the distributor is seated back in properly.

Once the lower intake came off, I removed the valve covers, then the rocker arm assembly. There are 3 bolts that hold the rocker assembly down to the head. Loosen the one in the center first, followed by the other two in either order. The rockers lift off easily after removing the bolts. They are identical, but you want to make sure they go back on the same side they came off of. I labeled mine with my trusty tape and a sharpie. I got a box and cut slits in it so I could keep those bolts and the push rods in order. If you are going to re-use the push rods, you want them to go back in the same places they came out of. Take caution not to mix them up.

Once taking the intake gasket off, I did an inspection of the lifter valley, particularly to see if the oil journals were draining properly. As expected, about half of the return journals were gunked over. I will address this later. I am a bit torn between cleaning them out with a wire coat hanger or taking a small auger bit for a drill and running that down to lift the crud out of the journals. Of course, I will have to use extreme caution not to run the bit into the metal and scar it up. I will follow that up with some solvent and some sort of heavy-duty pipe cleaner to make sure they are clear.

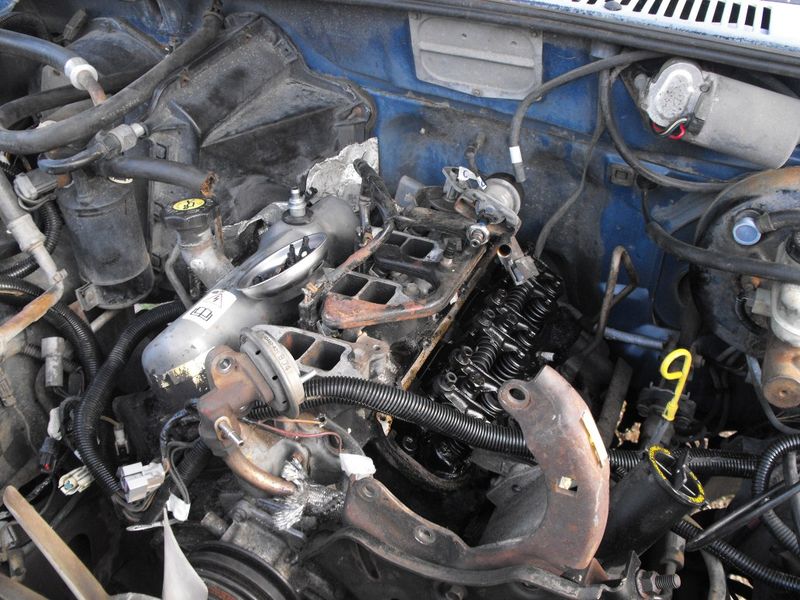
I decided to take my exhaust manifolds off at the flange and remove them as a single unit with the heads. I had to break out the big impact wrench and use a LOT of penetrating oil and a breaker bar to get the bolts out. That was probably the most painful part of this build so far. I had a bit of trouble with the left side head removal doing it this way because the EGR tube got wedged into the oil dipstick tube. It took a fair amount of finesse to get it out. This of course after taking the head bolts out. those were in there really tight and I had to use a breaker bar on a couple of them. Be careful, though as these bolts have Torx heads and if you strip the bolt head out it will be a bastard to get out. My Torx bit twisted a little taking the head bolts out, so I will have to buy another one for reassembly to make sure I don't damage the bolts.

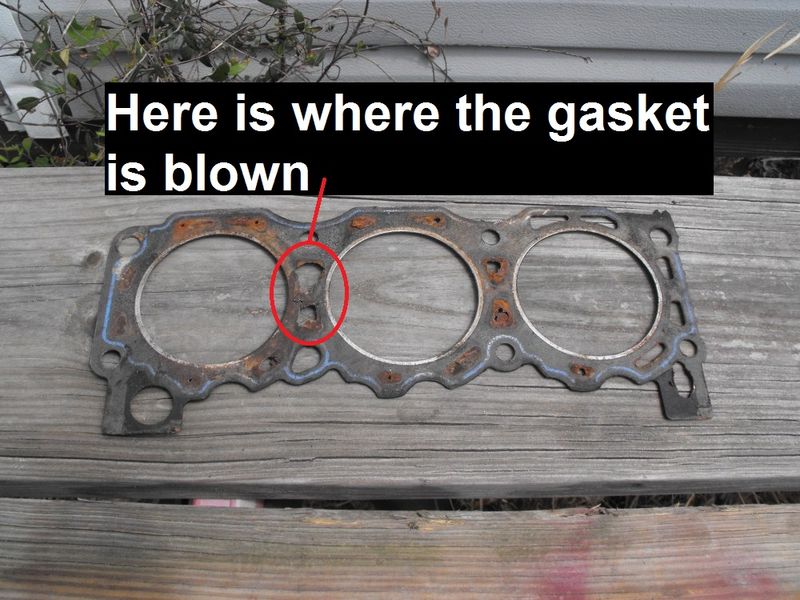
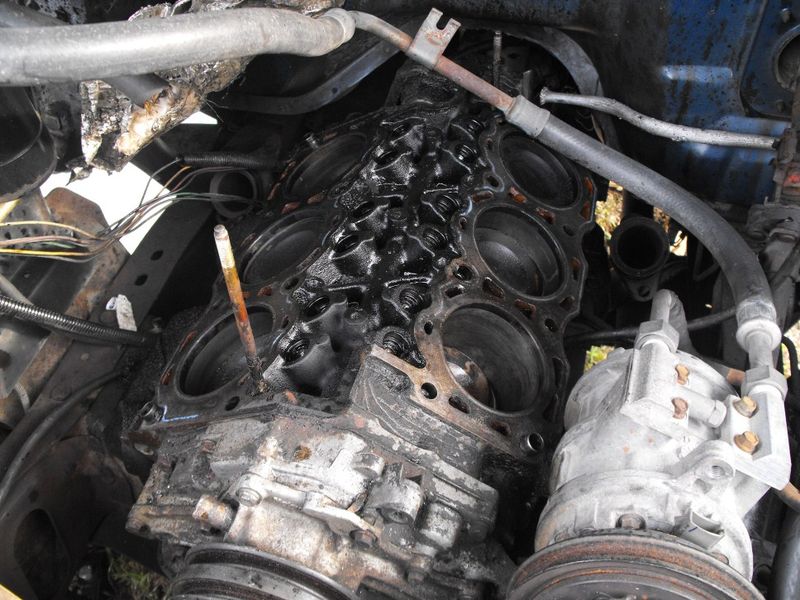
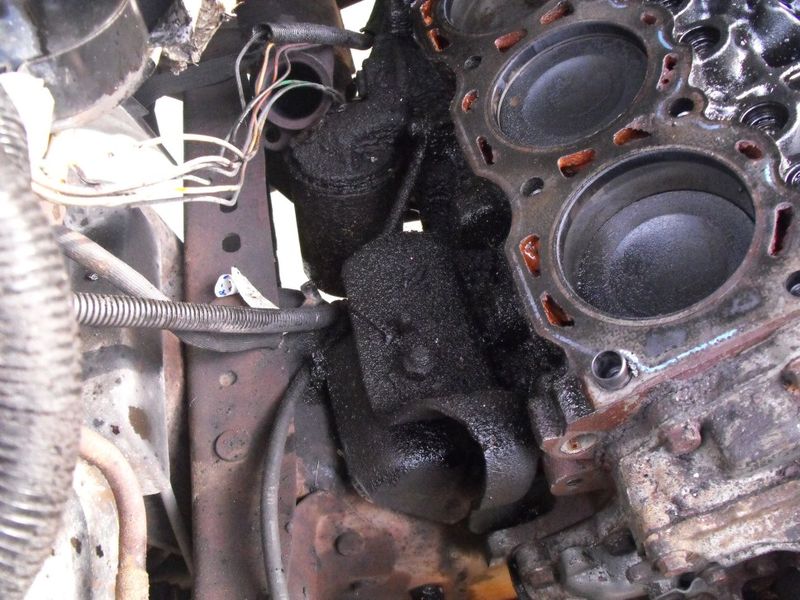
Once I had the heads off, I did a basic visual inspection - Starting with the gaskets to look for signs of where the failure was. I found it pretty quickly on the left head between the water jackets between the #1 and #2 cylinders. I inspected the head in the same area as the gasket failure and discovered a crack between the water jackets. That was enough for me to decide to go with a pair of re-manned heads. Upon inspection of the gaskets and heads. I found gobs of stop leak/Block sealer that had almost completely blocked off the cooling passages between the block, heads and intake. If the engine is the heart of the truck and the water is the blood, it basically had a heart attack. Here are some pics of the gaskets and blockages:

Image

Image

Image

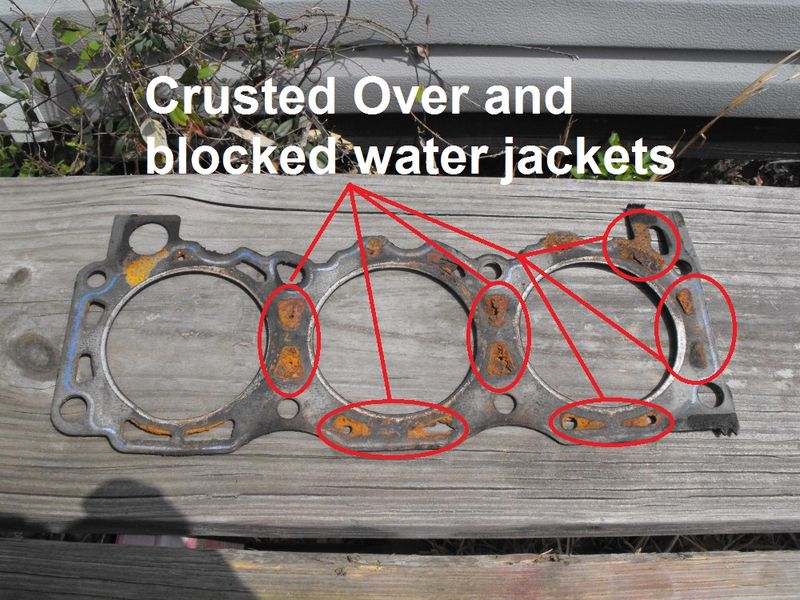
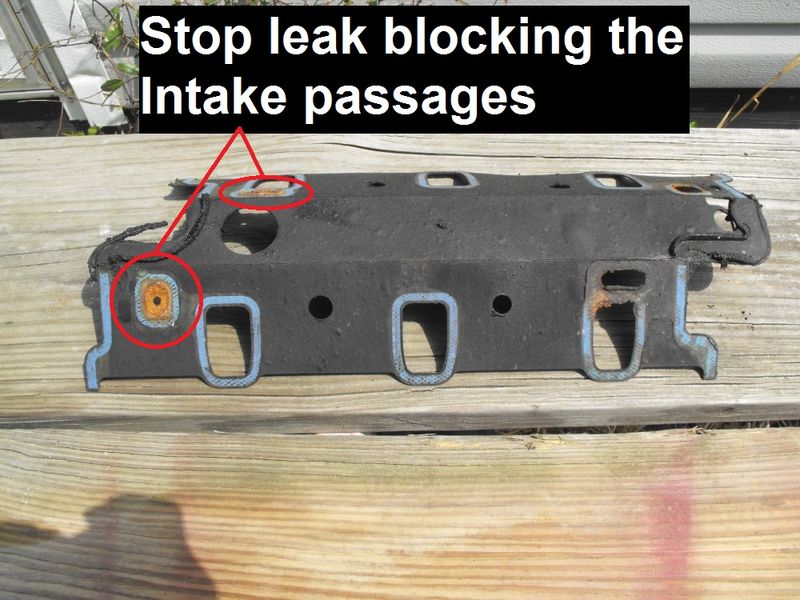
Since I was told that the B2 also had a leaking water pump and that the heater core had recently been replaced, I suspect that the previous owner tried to fix the water pump by dumping a bunch of stop leak into the radiator. I am fairly certain that this was the cause of the blown gasket/cracked head. Incidentally, the water pump was not leaking... The heater hose had a hole in it and sprayed water down the front of the pump. I am replacing the pump anyway. They are cheap enough.

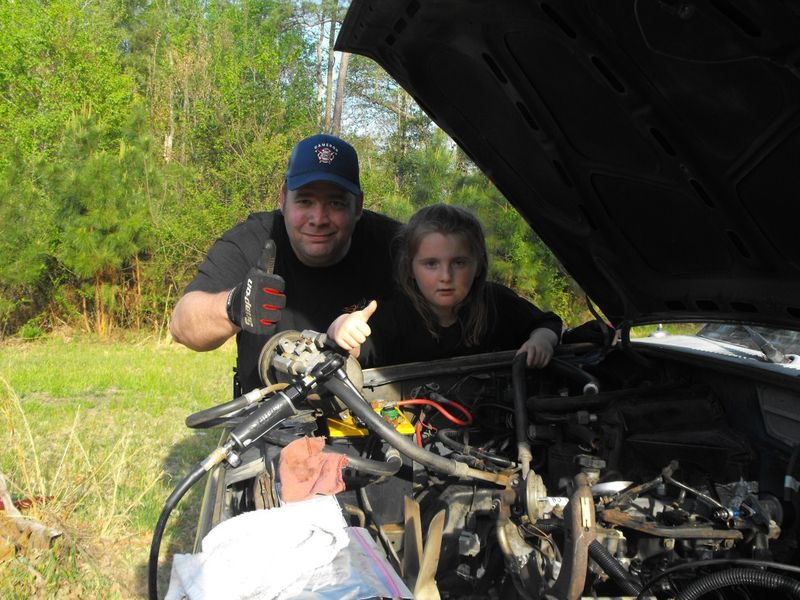
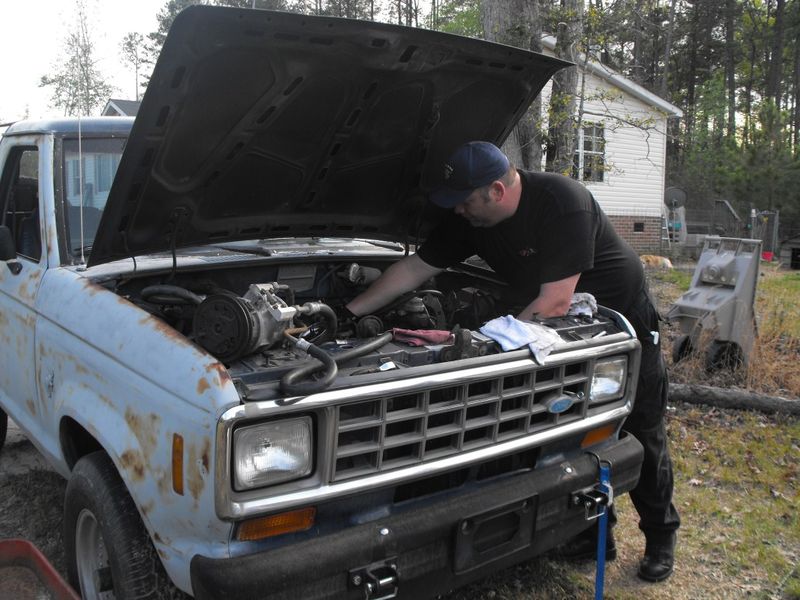
Here are a few shots of the work in progress:

Image

Image

Image

Image

Image

So, while the heads are off and I am waiting on replacements, it is cleaning time. Since I had all of the parts off, I thought I would take the opportunity to not only clean the parts that came off, but paint them up so the engine will look good once it goes back together.

I started with the valve covers. 3 cans of easy off on both the inside and the outside cleaned them up really well. The original color of the covers was battleship Grey, but I wanted to go with something a little more colorful, so I painted them blue. I know, I know... Blue has been done to death, but I think it will look great next to other plans I have for other parts.

The insides of the covers was NASTY! There was a bit of sludge and more of my favorite... Baked on CRUD. Easy-Off to the rescue again! I scuffed, primed and shot the covers with 4 coats of blue and 4 coats of clear. After letting them dry for 12 hours, I baked them in the oven at 200 deg. for an hour. They came out really nice.

From the look of the throat of the throttle body, I decided that the inside of the upper intake must be nasty as well, and I was right. They were not only blackened, but there was crud buildup in there as well. Again, the Easy-Off came out. I removed all of the sensors from the intake to make sure I didn't damage them and put them into a 1 gallon zipper bag. I like the zipper bags that have the write-on area so I can label what the parts are that are inside. I filled the intake with the oven cleaner and let it soak in it for about an hour. I dumped it, rinsed it and repeated the steps until I could get no more out and the rinse water was running clear.

After cleaning and scouring, I cleaned and taped off all of the mating surfaces so I wouldn't get any paint on them. I also filled the threaded holes with cone-shaped wads of masking taps so that I wouldn't paint the threads. Now for the colors... I settled on Black, Yellow and Silver for the colors on the upper Intake. It is aluminum and has raised lettering on the top; I taped off the raised border around the lettering and painted the lettering and background black. Once that was dry, I taped that area off and painted the rest of the upper intake yellow. After the paint was dry, I removed the tape and sanded the raised letters to get the black paint off of them, revealing the silver/aluminum color underneath. I cleaned it up with prep solvent and blew it dry with the air compressor and then put 4 coats of clear over it. The next day, I baked it in the oven at 200 deg. for an hour.

here they are before and after...

Before:
Image

After:

Image

I will update as the build goes on.

Tom
Tom Moog

This post contains artificial watermark. Hold at angle to view.
moogvo
Posts: 14
Joined: Sat Feb 12, 2011 8:09 pm
Location: Hazzard County, NC

Re: Budget Build 86 B2

Post by moogvo »

Maybe I should update this since I have actually been driving the B2 for about a month now...

I stripped the lower intake of the injectors and fuel rail. I noticed that there was a lot of black deposit in both the upper and lower intake. I cleaned them out using Easy-Off Oven cleaner and later graduated to spray paint stripper. I used the opportunity of the engine being almost all the way apart to clean all of the gack off of the block, and believe me when I tell you that there were LARGE amounts of gack!

I replaced the water pump. While the pump was off, I cleaned the passages into the block to get rid of all of the lingering stop-leak that was crudding up the works. I got a long brush from Lowe's to clean the water jackets out. I put on the new water pump and replaced the thermostat. I cleaned and painted the thermostat housing while it was off. I also replaced the coolant temp sensor and the sending unit while I was in there.

I got my remanned heads... bought them from Cylinder Heads International - an outfit out of Texas. I ended up getting the later model "89TM" castings. I got a head set and started putting it all back together. It took me about 3 days. I had a problem finding bolts for the exhaust manifolds... All of the ones I could find were either too short or the shoulders of the bolts were too long. I ended up finding bolts that would "do the job" at Fastenal. I did have to buy 50 of them in order to get the 5 I needed. They were cheap enough tho. Over the next several days, I had to run to the store several more times to round up the bolts I needed since some of the holes in the new heads were larger than the old heads. Strange, but it is what it is.

Of course, the B2 uses "Torque-to-yield" bolts, so I bought new ones and started threading the heads down. Torquing them brought sweat to my forehead. I really gave my wrench a workout torquing them down.

I put the rods and rockers back on after using assembly lube. I probably didn't have to use the lube, but hey... What's it gonna hurt. I got it all back together except for the pipes to the exhaust manifolds. I had to go to the local muffler shop for that. I got it all put back together and routed the wiring harnesses and re-connected them. When I cranked it the first time, I realized that the distributor went back in one tooth off, so the upper intake had to come back off so I could reset the distributor. It fired up on the first turn of the key after that.

I had used all new belts and hoses on re-assembly. When I went to flush out the coolant system, I couldn't get the radiator to drain through the petcock. The radiator was apparently partially stopped up from the stop Leak that had been used in it before I got it. A new radiator later and I began to flush the system. I spent about 2 hours making sure to get all of the crud out of the cooling system. It was time well spent, since I open the cap and see nothing but green... my temp gauge stays low too. I noticed a nasty hesitation that occurred at random after getting the B2 running and tagged. I replaced the Ignition Control Module and teh EEC Relay. I still have a random hesitation, but it isn't anything like what it was. I also re-grounded the computer.

After getting it running good, I noticed an oil leak every time I drove the B2. I thought it might have been the rear main seal, but closer inspection revealed that it was the oil filter block adapter that was leaking. An o-ring from Advance and that was solved. For a 23 year old ragged truck not to leak any fluids is pretty cool!

The next item to take care of was the non-working AC. I looked over the system for leaks and found several. I took all of the lines loose to clean them and put fresh O-rings on all of the connections since I was going to retrofit the system for 134A. I had to use a torch to heat the lines at the condenser to make them come loose. The Dremel tool helped me clean it up and get all of the pieces of fried O ring off. I pulled the compressor and replaced it with another one. I got a re-manned unit. I know, that wasn't the right way to go, but it was a LOT less than a new one. I also replaced the accumulator/dryer and orifice tube. I filled the evaporator core with brake kleen several times and blew it out with an air compressor to get all of the old crud out of it. I got a lot of oil and a handful of metal shavings. I also cleaned all of the lines and the condenser out the same way. At re-assembly, I put 5 ounces of Ester Oil in the compressor and then shot 3 more ounces into the dryer valve after pulling a vacuum on the system. I filler her up with some 134A and a shot of UV dye so I can detect future leaks. It blows like a champ. Total cost involved: $260.00 I need to replace the blower resistor since I only have high speed on the fan, but it is okay because high speed doesn't seem to blow very strong anyway. I vacuumed out the blower motor box and the evap core area to make sure there weren't a bunch of leaves, nests and such in there.

Honestly, Air conditioning is no big deal to fix. It is definitely something the home mechanic can do. You just need the tools to do it.

So now that it is running good and has working AC, I can turn my attention to the non-working 4 Wheel Drive.. I might wait until the fall to mess with it, but I really would like to go wheeling this summer too. We shall see how that goes. I would really like to put a manual shift T-case on, but I suppose it might be best to fix what is broken. Also slated for the fall is some body work and a paint job.

I gotta say... I am loving this thing!
Tom Moog

This post contains artificial watermark. Hold at angle to view.
moogvo
Posts: 14
Joined: Sat Feb 12, 2011 8:09 pm
Location: Hazzard County, NC

Re: Budget Build 86 B2

Post by moogvo »

I decided that with the winter weather approaching, it was time to think about the 4x4, and getting it working. After pulling the dash apart and running all the tests, testing the switches, module, and wiring, I decided that the transfer case motor was bad. I crawled under and started taking it off. I noticed that the bolts were wrong and the electrical connector was broken (the snap locks on the weatherpack connector). I unbolted it and disconnected it. There was one wire left that went straight into the transfer case. I ended up having to cut it because I didn't want to destroy the connector since I planned on fixing the motor and putting it back on. About halfway through taking the cover off, I decided to see what a replacement would cost. I looked it up on my AutoZone phone app and they had one. I called Advance to see if they also had one and it was in stock. I picked it up, put it on ans now have 4 wheel drive. I like this thing better all the time!
Tom Moog

This post contains artificial watermark. Hold at angle to view.
Mudhog1977
Posts: 206
Joined: Wed Apr 13, 2011 4:16 pm
Location: Warren,tx

Re: Budget Build 86 B2

Post by Mudhog1977 »

The lil b2's are addictive I think lol
Live to ride, ride to live, thats how I roll
User avatar
tomahawk350
Posts: 16
Joined: Thu Oct 27, 2011 9:11 am
Location: Johnstown, PA
Contact:

Re: Budget Build 86 B2

Post by tomahawk350 »

Moog, great write up! Great to hear a B2 gettin fixed up and enjoyed. I have 227k miles on my B2 motor, I know those are orig miles cuz I used to own mine years ago. I also notices the Gearz t-shirts ur guys were wearing, Wish I had Speed channel, Stacey David is a awesome builder... Is that ur daughter in the pics? My daughter loves goin with me in my B2, wheelin or otherwise...
Lets see some currents pics...
JoshKinslow
Posts: 15
Joined: Sun Aug 05, 2012 10:21 pm
Location: Chandler, AZ

Re: Budget Build 86 B2

Post by JoshKinslow »

I got my first bronco ii and I have a 6 inch lift with 32's. AWESOME!!!!! And got it all for $700 and titled, with the right honest owner.
neald
Posts: 2
Joined: Wed Sep 03, 2014 5:17 pm
Location: Poughkeepsie, NY

Re: Budget Build 86 B2

Post by neald »

Curious to see how your b2 project is now 2 years later.
stevek217
Posts: 8
Joined: Sun Oct 11, 2015 5:21 am
Location: Ohio

Re: Budget Build 86 B2

Post by stevek217 »

Thanks for the detail of your project. Very helpful in helping me diagnose and trouble shoot my 86 b2 project.
laverneland
Posts: 1
Joined: Tue Aug 21, 2018 1:27 am
Location: New York

Re: Budget Build 86 B2

Post by laverneland »

Many thanks for sharing this post! I was able to learn necessary things! I am curious to see your further consideration on this!
Post Reply