|
How do you make this thing anyway? |
|
   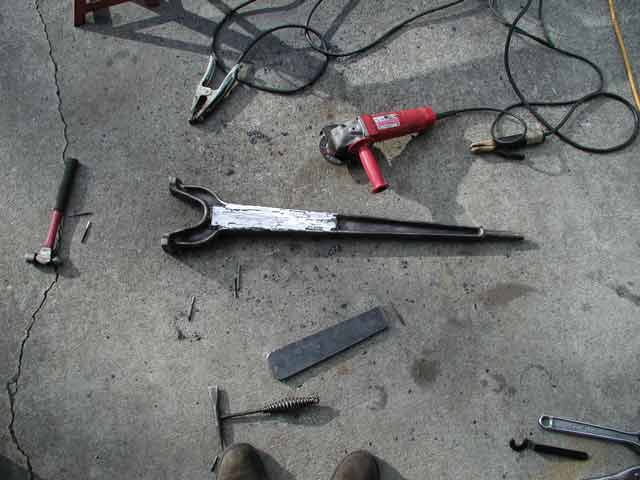   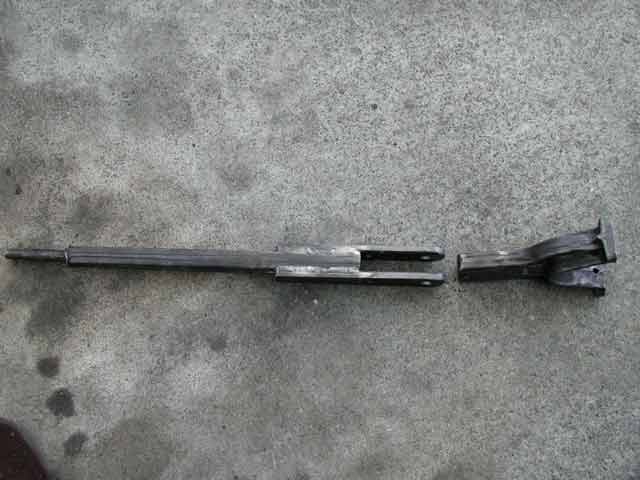   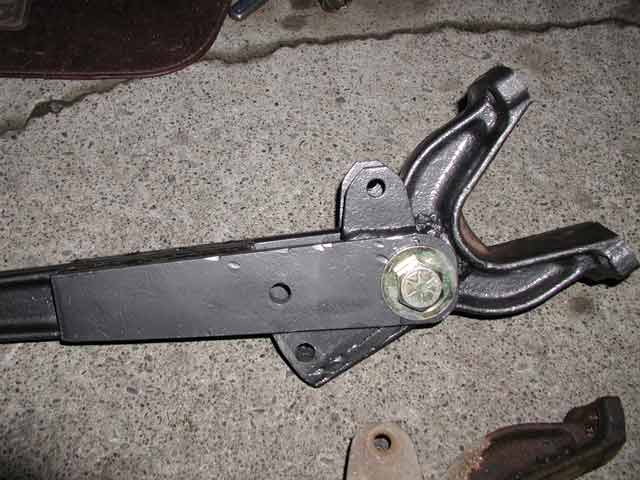 |
Material: 4 Feet 1/2" x 3" flat stock 7/8" bolt with 2.5" smooth shoulder 7/8" locknut, 2 flat washers, 1 lock washer 5/8" hitch pin Step 1: Grind the heads off the rivets retaining the shock mounts. Use a punch to drive the rivets out. They are stubborn, but will come out. Try not to ruin the shock mount pieces, they can be re-used. Step 2: Use a wire wheel to thoroughly clean the arm. The welds are critical, and the prep work is essential. Step 3: (Inner Pieces) Cut two 1foot pieces of flat stock. One straight edge will be used. Make some rough measurements and cut one side of each plate so it matches the taper of the arm. Use another piece of steel as a straight edge, and clamp it to the freshly cut piece. Grind until flush. Bevel the inside edges and remove additional material until they fit the arm. The fit should be somewhat loose to ensure the plates set flat, and to allow a deep weld. Step 4: (Outer Pieces) Use the same process to create the outer pieces. Bevel the inner edges to allow a deep weld. Round the corners at the c-bushing end to allow the arm to pivot. This can be perfected once the arm is cut. Step 5: Weld the inner pieces in place. All welds need to be done by an experienced welder. They will already know proper welding technique. Step 6: Grind the welds and "splatter" until arm is flat and free of burrs. Step 7: Tack weld the outer pieces on. Keep in mind these will need to be removed after drilling. Step 8: Drill a 7/8 pivot hole and a 5/8 pin hole. The pivot hole should be as close to the C-bushing as possible, but not so close that it will prevent the arm from pivoting. Use your best judgment. Drill the pin hole a few inches back from the pivot hole. Be sure to leave about 6" from the pin hole to the back of the plate for welding. Step 9: Mark the outer plates in multiple places, so they can be lined up exactly as they were. Grind the tack welds and remove the outer plates. Cut the arm in half. Round the corners of the C-bushing end to allow it to pivot. This can be perfected once the arm is assembled. Again, make sure to allow for 6" of weld on the outer plates. Step 10: Bolt and pin the outer plates to the C-bushing end of the arm. Use a c-clamp to secure the back half of the arm between the plates. Tap the arm into place. Make sure the marks made previously line up. Weld the plates on. Step 11: Grind as necessary so the arm pivots freely Step 12: Cut the old shock mount plates down. Use a dummy bushing or some other spacer and bolt the pieces together. Position the assembly on the arm allowing the arm to pivot equally in both directions. Weld weld weld. I think we're done. Throw some paint on that thing and get it installed! |